Guides / Process
Machined Parts for Burn-In Boards and Socket Fixtures
October 12, 2026
Burn-in is a stress test. Devices sit in sockets on a board, powered and often cycled, in an oven at a raised temperature for many hours. Weak parts fail early and are removed. The test is a routine step for many chips, and it needs a lot of boards, because every board holds only a limited number of devices and every device has to stay in the oven for hours.
Most of the engineering is electrical. The parts people forget to plan are mechanical: the plates, frames, lids and guides that hold the board, retain the device and survive the oven again and again. This guide lists the parts, the materials that work at burn-in temperature and the tolerances that matter.
The conditions the parts live in
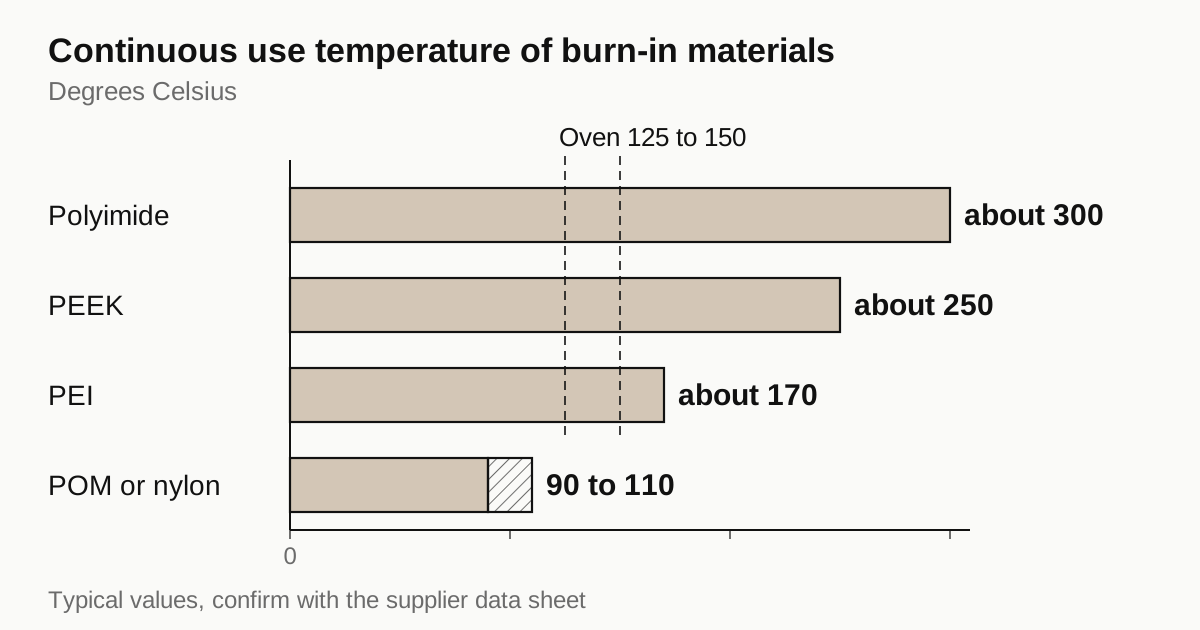
A burn-in oven typically runs at 125 °C, and some programs run at 150 °C. Test time can range from a few hours to a few days. The devices are powered, so heat from the devices adds to the oven temperature. The boards cycle in and out of the oven, which loads the parts with thermal expansion and contraction every time.
Four stresses matter to the mechanical parts: sustained temperature, thermal cycling, repeated insertion and removal of devices and handling by operators and loading machines. A part that survives one cycle can fail on the hundredth.
Which parts a burn-in setup needs
A typical set around one burn-in board includes:
- Stiffener or backing plate. Keeps the board flat. A large board with many sockets bends under the insertion force and under heat.
- Socket lids and clamp plates. Press the device into the socket and hold it during the test.
- Heat sink or thermal plates. Remove heat from the device in higher power parts, or distribute it.
- Alignment guides and device guides. Put the device in the right place when an operator or a machine loads it.
- Retention frames and covers. Hold sockets and keep dust off.
- Standoffs, spacers and rails. Set board spacing in the rack.
- Rack hardware and brackets. Mount boards in the oven.
- Connector protection. Guards and shrouds.
Not every setup needs all of these. A simple board may use a stiffener and a lid. A high power test needs a heat spreader on every device.
Materials that work at burn-in temperature
| Material | Continuous use, approx. | Electrical | Typical use in burn-in |
|---|---|---|---|
| PEEK | about 250 °C | Insulator | Socket frames, guides, spacers |
| Torlon (PAI) | about 250 °C | Insulator | High load clamps, wear parts |
| PEI (Ultem type) | about 170 °C | Insulator | Covers, lids, guides |
| Polyimide (Vespel type) | about 300 °C | Insulator | Precision guides, high temperature parts |
| Glass reinforced composite | 200 to 260 °C, grade dependent | Insulator | Plates, backing, stiffeners |
| Aluminum, hard anodized | Above oven temperature | Anodize insulates, base conducts | Heat sinks, plates, frames |
| POM or nylon | 90 to 110 °C | Insulator | Below the usual burn-in temperature |
Typical values. The last row is a warning: standard POM and nylon do not suit a 125 °C oven for days, whatever they do in a room temperature fixture. For a comparison of those materials, see POM, MC nylon and bakelite for jigs, and for the high temperature plastics see PEEK, Vespel and Torlon parts.
Flatness, stiffness and the board
A burn-in board is large, thin and loaded with sockets. The insertion force of a socket can be tens of newtons per device, and a board with a hundred sockets sees a load of several kilonewtons during loading. Without a stiffener it bows, and the contacts at the centre lose pressure.
The stiffener, a plate under the board or a frame around it, must be flat and stiff at temperature. Aluminum plate stress relieved and ground flat gives a stiff, light, heat conducting stiffener. Anodizing protects it and prevents shorts if a lead touches. For boards that must stay electrically isolated, a thick composite plate does the same job with no conduction.
Flatness tolerance on a stiffener is typically in the 0.1 to 0.2 mm range across the plate, which is a moderate figure. See flatness, parallelism and GD&T for how to specify it. What matters more is that the plate stays flat when it heats. A plate that is flat at room temperature but contains machining stress will warp in the oven. Stress relieve before final machining.
Hole patterns and the stack
Mounting holes in a stiffener and a lid have to line up with holes in the board and the socket. A board has its own tolerance, and a socket has its own. Stack tolerances on a pattern with many holes become tight quickly. A drilling tolerance of 0.1 mm on each of two plates can add up to 0.2 mm of mismatch between them, and a pin that must pass through both will bind.
Common remedies: slotted holes in one of the parts, clearance holes larger than the pins and precision locating pins in only two holes with clearance in the rest. See tolerance stack-up for fixtures. Put the datum on the board edge or on two locating holes, not on the plate outline.
Need a quote for this part? Get a quote
Thermal expansion
At 125 °C a part has grown. An aluminum plate 400 mm long grows by about 1 mm between 20 and 125 °C. A PEEK frame grows by a similar or larger amount. A glass epoxy board grows less. If the plate is screwed rigidly to a board with a different expansion coefficient, the board is loaded and may bow.
Fix the board at one corner or one edge and let the rest float with slotted holes or compliant washers. Pick materials with similar expansion where parts must stay rigid together. This is a design matter, but it shows up in the drawing as slot lengths and washers, and a shop that knows what the part is for can warn about a rigid mount before it is cut.
Insertion cycles and wear
A socket lid presses on a device thousands of times. The contact surface of the lid wears, and so does the guide that places the device. Materials with low wear and a stable surface, such as PEEK and polyimide, last longer than softer plastics. Hardened steel or ceramic inserts at the contact point are used where the cycle count is very high.
Wear parts should be treated as consumables and bought as spares. Spares and consumable planning covers how to decide quantities.
Surface and cleanliness
A burn-in oven is not a cleanroom, but the devices and sockets are sensitive to dust and fibres. Plastic parts that shed fibres or flake are a problem. Machined parts should be deburred, washed and packed clean. For ESD sensitive product, dissipative plastics and anodized aluminum with a defined surface resistance may be required. See ESD materials and coatings.
A worked example: a socket lid at 150 °C
Consider a lid that presses a package into a socket with a spring load and then holds it for 48 hours at 150 °C. Cut from POM it would take a set within the first few hours, as the plastic creeps under load and the spring force drops. Cut from PEEK it keeps its shape, but PEEK is stiffer and the spring has to be chosen for it, because the lid no longer absorbs variation in package thickness. Cut from anodized aluminum it keeps the load and carries heat away from the device, but the lid conducts, so the anodize layer has to be intact and the edges must be broken so it does not chip and expose bare metal near a lead.
Three materials, three different behaviours, one drawing. The shop can cut any of them. Only the buyer knows the load, the temperature and the heat path, which is why the RFQ should state the use, not only the shape. A short line such as “holds a package at 150 °C for 48 hours under 5 N spring load” tells the shop what the part is for and lets it flag a mismatch before the first chip is cut.
What to ask a shop
- Which plastic grades do you stock for 125 to 150 °C service, and from which supplier?
- How do you stress relieve a plate before final machining?
- What flatness have you held on a similar plate, with a measurement report?
- Can you drill a hole pattern to the board’s tolerance and verify it?
- How do you wash and pack plastic parts?
- Can you quote the same part in two materials so the buyer can compare cost and life?
Burn-in parts sit alongside the other part families in our guide to semiconductor jigs and fixtures.
Checklist before you send the RFQ
- Board outline, mounting holes and socket footprint
- Operating temperature, time and cycling
- Material, grade and acceptable alternatives
- Flatness and hole position tolerance, with datum scheme
- Expected number of insertion cycles and the spares plan
- ESD, cleanliness and packing requirement
- Quantity per rack and the number of racks
Send them with the drawings through the RFQ form. We place it with a partner shop and send one itemised quote within 24 business hours. For the cost side of this kind of part, see what drives the cost of a semiconductor test jig.
Frequently asked questions
What is a burn-in board?
A printed circuit board that holds many devices in sockets while they run powered in an oven, usually at 125 °C or higher for hours or days. The stress brings out early failures before the product ships. The board plugs into a rack in the oven. Mechanical parts around it hold the board flat, retain the devices and protect the connectors.
Why do burn-in parts use plastics like PEEK or Torlon?
They hold their shape and strength at the oven temperature, insulate electrically and weigh little. Ordinary plastics such as POM and nylon soften or creep at 125 to 150 °C. Aluminum parts are also common, usually anodized, where electrical isolation is not needed and heat has to move.
Do I send the board design with the RFQ?
Send the board outline, the socket drawing and the hole pattern. Mechanical parts must match the board's mounting holes and the socket's footprint. Without them a shop can only guess, and a plate cut to the wrong pattern is scrap.
Need a quote for this part?
Send the drawing. We quote the finished parts, place the work with a partner shop in Vietnam and reply within 24 business hours.
Get a quoteMore on process
- JEDEC Matrix Trays and Custom Carrier Trays: When Machined Replaces Molded
- Designing a Package Nest: Pocket Size, Clearance, Lead-In and Datum
- Planning Production When Urgent Spares and New Jigs Share the Machines
- Semiconductor Jigs and Fixtures: Which Part Family, What to Specify, What Fails and Who Makes It
All guides and the sourcing glossary.